// tools · astro toolkit
Astro Toolkit — plan, review & arrange
A single-binary Qt6 desktop app that follows one imaging project end to end: a deep-sky target planner that scores what's worth shooting tonight from your location and gear, a FITS reviewer with a scored auto-quality check to cull bad subs, and a frame arranger that sorts a messy capture folder into a stacker-ready tree. Free and open source — built for my own KStars/Ekos rig.
Source & full docs: github.com/nirmaljangid/astrotools
The idea: Plan → Review → Arrange
The app mirrors the real life-cycle of one project, left to right across the top tabs. You don't have to use all three — many nights you'll live in Review only — but the tabs follow the way a project actually flows.
Plan
What should I shoot tonight, and how? Pick a target, see its sky path, frame it to your sensor, get an AI imaging plan.
Review
Which of last night's subs are keepers? Flip through frames in four stretch modes; Auto Review scores and culls the junk.
Arrange
Sort this pile of FITS into a stacker-ready tree — lights grouped by target and filter, calibration frames auto-matched.
Build & launch
All dependencies are standard distro packages. On Ubuntu / Debian:
sudo apt-get install qt6-base-dev libcurl4-openssl-dev libcfitsio-dev \
    nlohmann-json3-dev cmake pkg-config libgps-dev
Then build the single-binary app — one translation unit, so it compiles in ~10–15 s:
git clone https://github.com/nirmaljangid/astrotools.git
cd astrotools
cmake -B build -DCMAKE_BUILD_TYPE=Release
cmake --build build -j$(nproc)
Seed the object catalogue (the planner needs it), then run:
mkdir -p ~/.astro_gui
cp data/catalog.sqlite ~/.astro_gui/catalog.sqlite   # bundled OpenNGC catalogue (~14k objects)
./build/astro_toolkit
On first launch the app writes ~/.astro_gui/config.json with defaults
and detects your location (gpsd → IP geolocation). Arch, Fedora and Windows builds are covered
in the README.
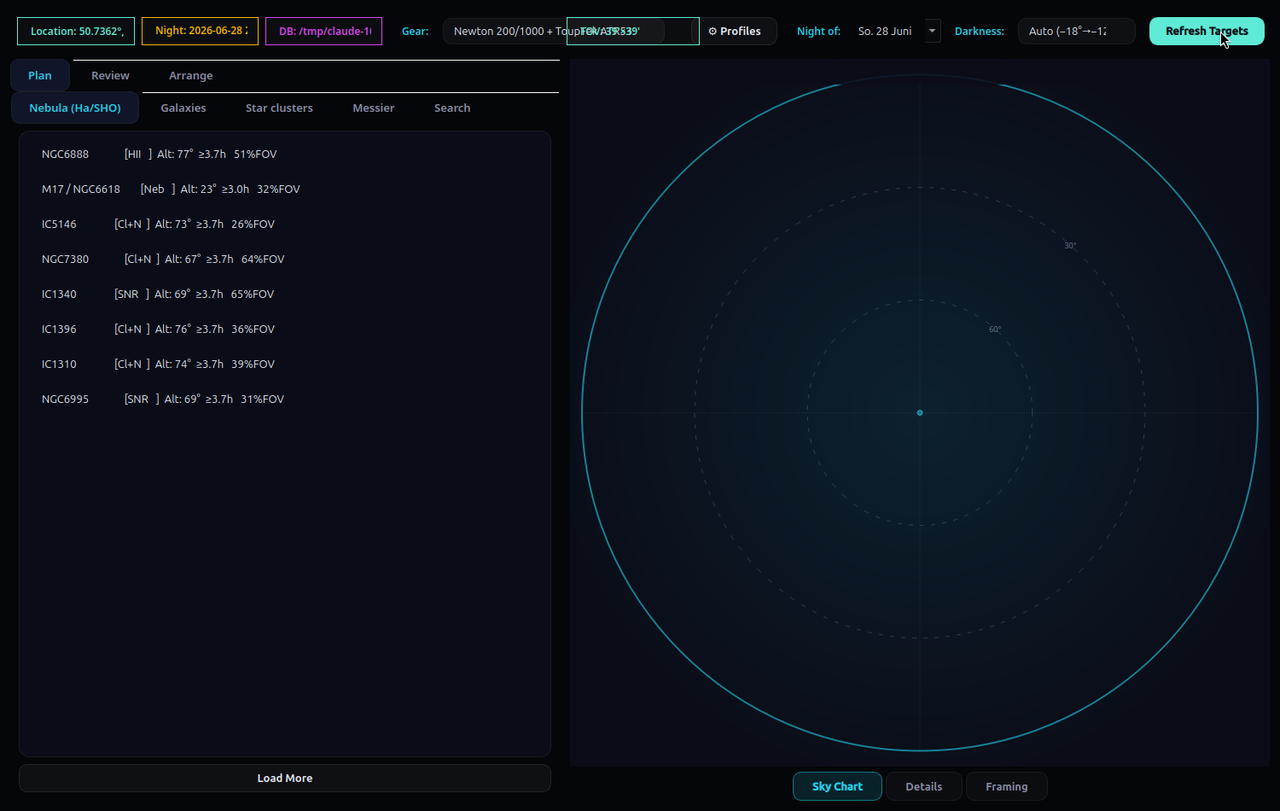
First, tell it about your gear
The most useful thing to do before planning is to create a gear profile. It drives the FOV indicator, the framing overlay, and the AI imaging-plan prompt. Open ⚙ Profiles in the toolbar and fill in your scope and camera:
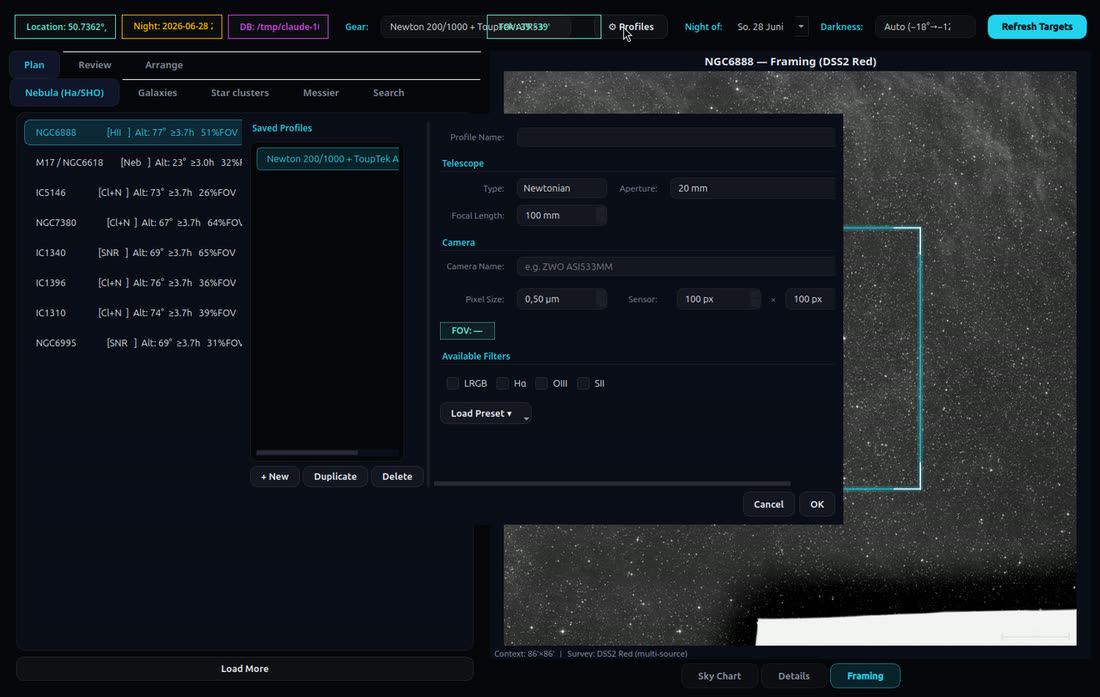
| Field | Example (a typical astrograph) |
|---|---|
| Scope type / focal length / aperture | Newtonian · 1000 mm · 200 mm (f/5) |
| Camera / pixel size | ToupTek ATR533MM · 3.76 µm |
| Sensor width × height | 3008 × 3008 px |
| Filters | tick LRGB / Hα / OIII / SII as owned |
The FOV the app derives from those numbers is what the planner uses to filter out targets too big or too small for your rig — and to draw the framing rectangle later.
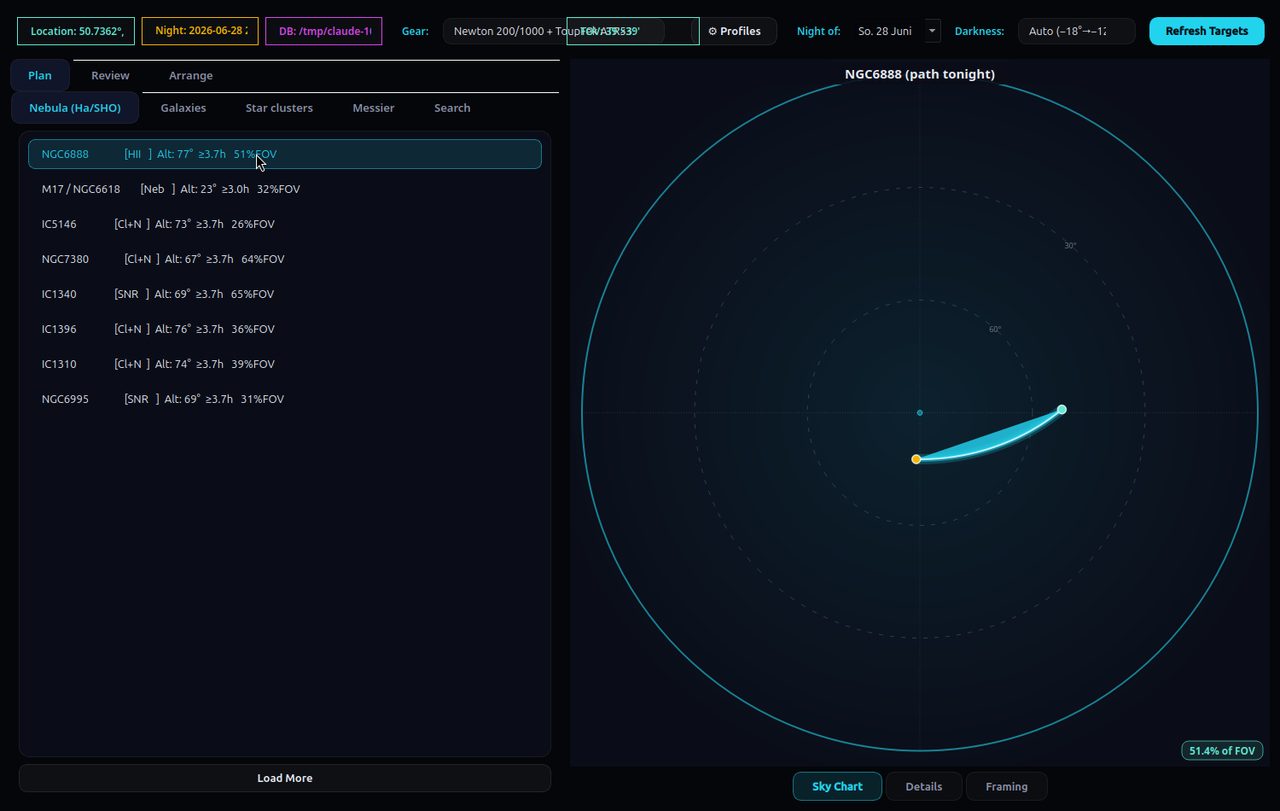
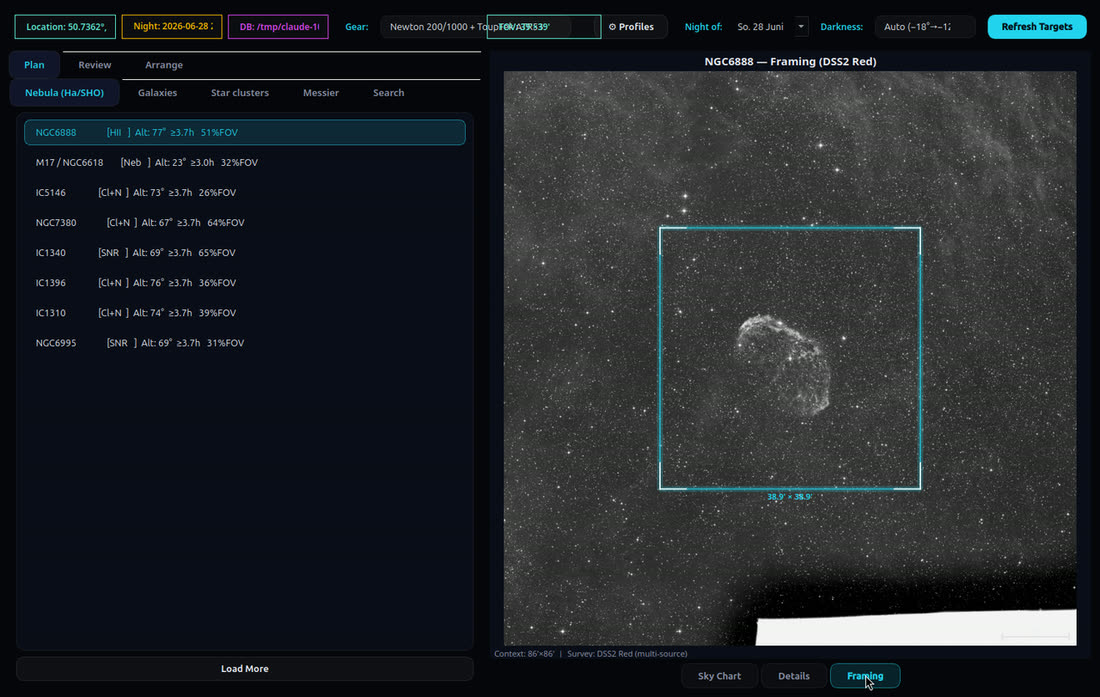
Plan — find tonight's target
Set Night of: (defaults to tonight), then Refresh Targets. For every candidate the planner computes an altitude-vs-time path across the dark window and keeps only objects that clear your minimum altitude for at least your minimum hours. The survivors are scored and ranked so the best things to shoot float to the top — rewarding high altitude, long time up, brightness, apparent size, and Messier / famous-object status, while penalising tiny obscure objects.
Inspect a target — three views
Click any object, then switch the right panel with the buttons at the bottom:
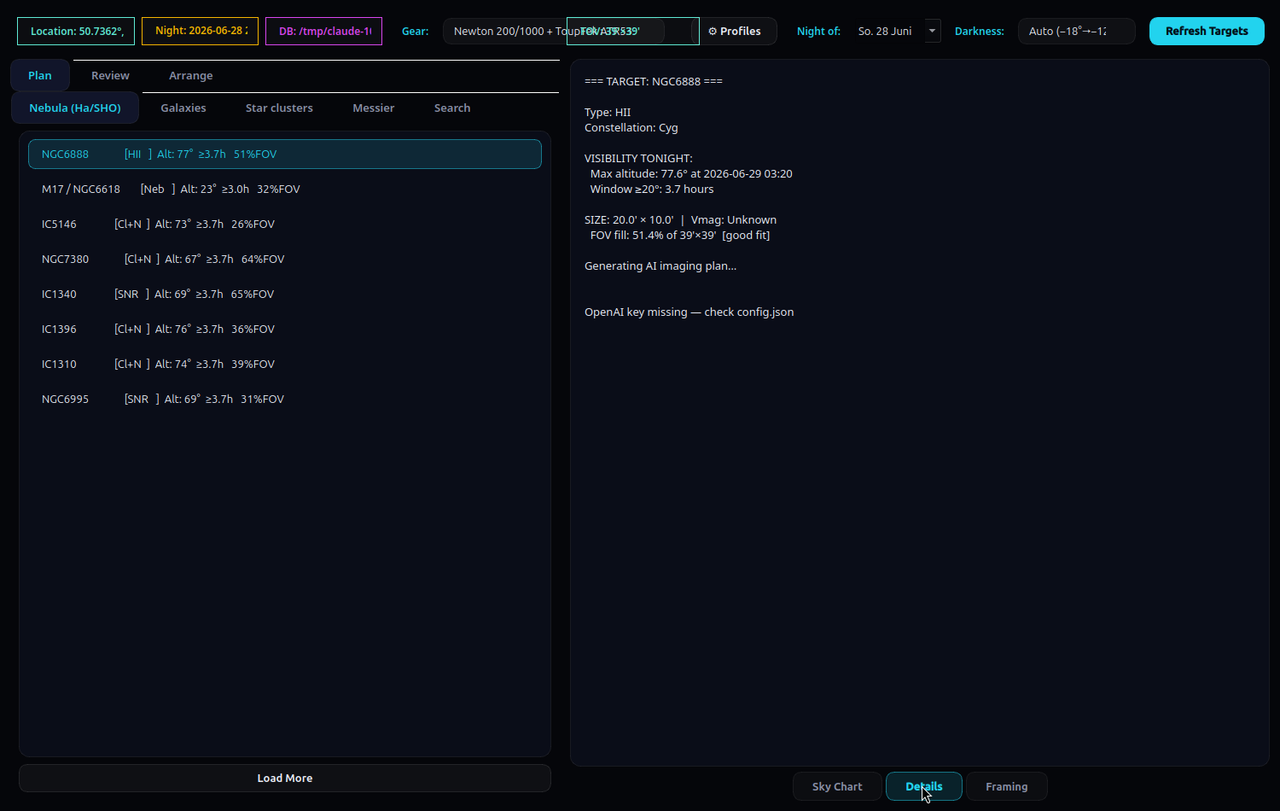
The Search sub-tab takes a catalogue ID or partial name
(M42, NGC7000, IC1805). An OpenAI key in
config.json unlocks the per-target imaging plan; without one, the rest of the app
is unaffected.
Review — cull last night's subs
The Review tab is a FITS browser plus quality-control workbench. Browse… to a
folder (scanned recursively) and the left list fills with every .fit/.fits/.fts.
Click a file or use ◀ Prev / Next ▶ to load it.
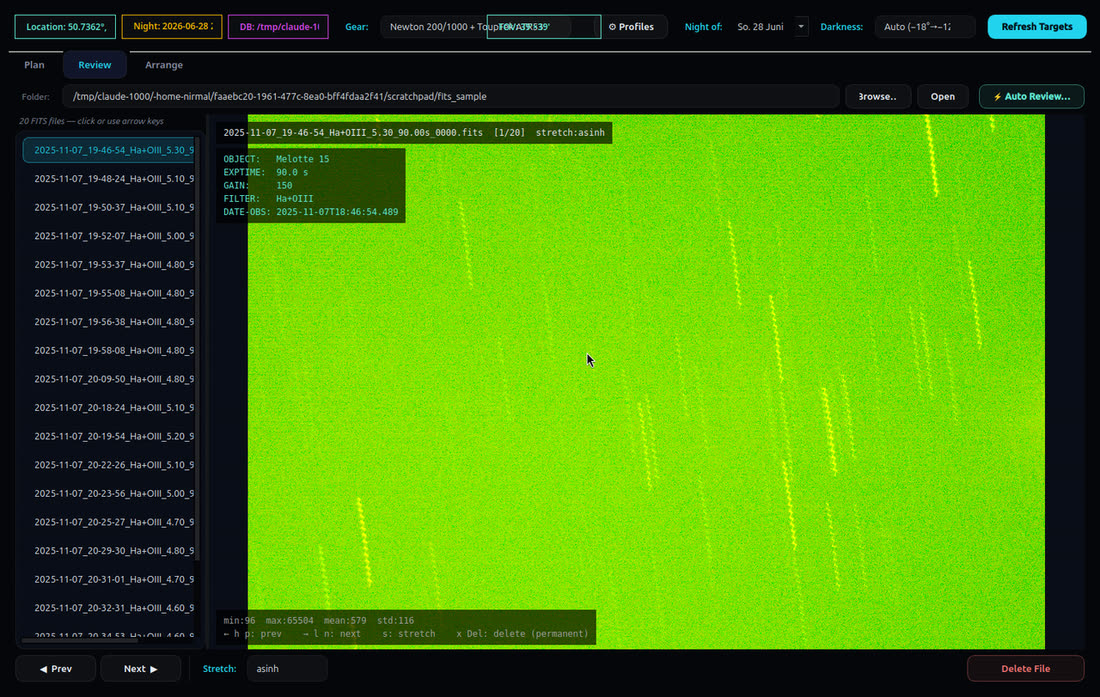
The Stretch combo cycles four display stretches; keyboard shortcuts work once the image canvas has focus (click it first):
| Key | Action |
|---|---|
→ l n | Next file |
← h p | Previous file |
s | Cycle stretch mode (linear → sqrt → log → asinh) |
x Del | Delete current file (with confirmation) |
Auto Review — it finds the bad frames for you
⚡ Auto Review… scores every loaded light frame in a background thread.
Calibration frames (IMAGETYP = bias/dark/flat) are skipped. On each light it
detects stars (background + 5σ threshold, connected-blob labelling) and classifies every blob:
a small round blob is a star, a long thin one (aspect ≥ 4.5) is a
trail, a big round one (> 50 px) is out of focus.
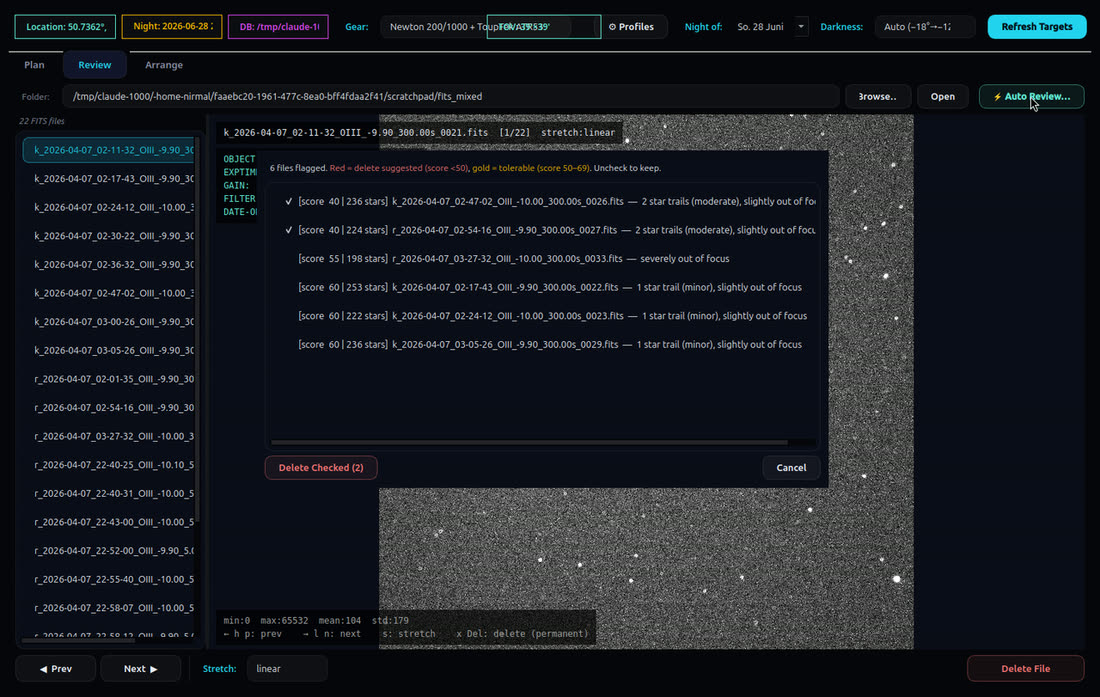
Each frame starts at 100 and loses points:
| Issue | Penalty |
|---|---|
| Star trails | −20 each, capped at −65 (so 1–2 trails are survivable) |
| Slight defocus (blob 50–100 px) | −20 |
| Severe defocus (blob > 100 px) | −45 |
| Low star count (< 15, focus fine) | −2 per missing star |
Results are bucketed, worst-first:
| Score | Meaning | In the dialog |
|---|---|---|
| ≥ 70 | Good | not listed |
| 50–69 | Tolerable | gold, unchecked |
| < 50 | Delete suggested | red, pre-checked |
You stay in control: uncheck anything you want to keep, then Delete Checked removes only the ticked files. A single minor trail or slight defocus typically lands at ~80, so it won't even appear — the tool is deliberately conservative about suggesting deletions.
Arrange — build a stacker-ready tree
Point Arrange at one messy capture folder (and, optionally, your bias/darks/flats folders) and it produces a clean tree you can hand straight to a stacker. Tick Dry run first to preview exactly what would be created — no bytes copied — then untick and run for real.
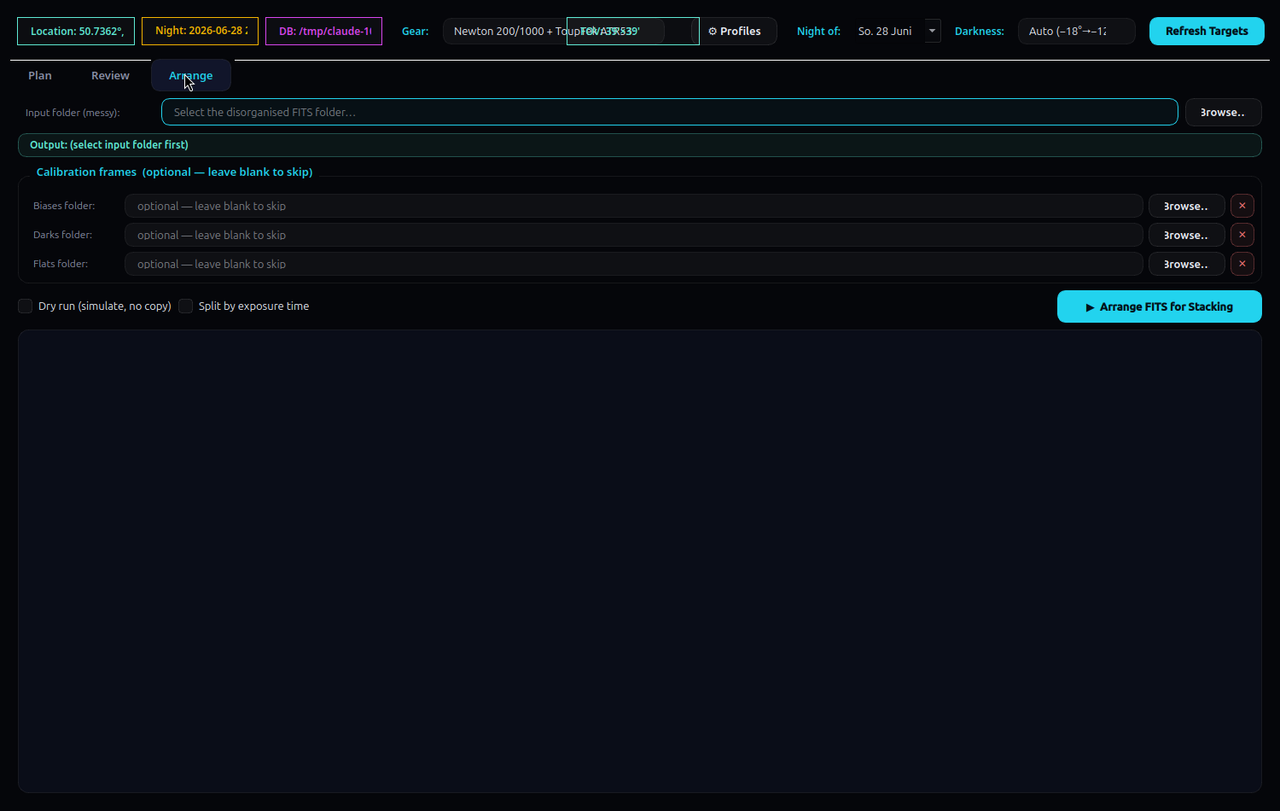
Each light is read for its OBJECT and FILTER headers and
copied (never moved) into:
arrange_<sourcefolder>/
  <Target>/
    <Filter>/
      [<exposure>s/]        # only if "split by exposure" is on
        lights/   ← your light subs
        darks/    ← matched dark frames (if provided)
        flats/    ← matched flat frames (if provided)
        bias/     ← matched bias frames (if provided)
Calibration frames are matched to each light group, not blindly copied:
gain within 15%, exposure within 10% (for darks), and
sensor dimensions must match exactly. Then open
arrange_…/<Target>/<Filter>/ in
Siril (or DSS / PixInsight) and
stack. Arrange does the tedious sorting; it doesn't stack — that's intentional.
A complete worked example
- Plan ▸ confirm your gear profile is active → Refresh Targets → open Nebula (Ha/SHO); the top result is, say, the North America Nebula.
- Sky Chart confirms it's high for 5+ h; Framing shows it overflows the sensor → plan a 2-panel mosaic; Details gives the AI plan (300 s Hα subs, gain 100, dither every frame).
- Next morning: Review ▸ browse to the light folder, stretch
asinh, delete the two satellite-streaked subs, then ⚡ Auto Review → keep the gold ones, Delete Checked. - Arrange ▸ lights + your calibration library → Dry run to preview → Arrange → open the output in Siril and stack.
Configuration & a security note
Everything lives in ~/.astro_gui/: config.json (location thresholds,
gear profiles, OpenAI key/model, catalogue path) and catalog.sqlite (the OpenNGC
database). Useful keys — min_alt_deg, min_hours_above,
page_size, openai_model — are documented in the
README.
⚠️ The OpenAI key is stored in plaintext in
config.json. Fine for a local single-user box, but never commit or share that
file, and rotate the key immediately if it ever leaks. Leaving it empty only disables the
AI-plan feature — nothing else.
New to the stack? Start with my Ubuntu setup guide, and once you're imaging for real, build a dark library.